How to Break in Soccer Cleats in Less than a Week? Easy tricks!
I was 9 years old when I got my first soccer cleats as a birthday gift from my dad. It was the famous Adidas F50 Adizero shoes and I was so excited to wear and play with them for hours and hours on the ground.
But, this sweet memory came with some bitter moments. After the first play session, I got severe foot pain, itching, and blisters on my soles. Being the family shoe specialist, my dad helped me resolve this issue and taught me how to break in soccer cleats, avoiding this thorn-itching pain.
And I know, I’m not the only one who faced this challenge. Many newbies still continue to experience such issues, without knowing how to correct this. Coming from a family of shoe enthusiasts and specialists, I feel, it is my duty to help you guys out! In this guide, I will share my secret tips to break in those kicks without compromising your comfort. (But, if you are in a rush, this infographic will highlight the process for you).
Top 7 ways to break in your soccer cleats
When I got my first pair of soccer cleats, I had to go through blisters and excruciating pain that cut my skin like a thorn. However, I took my lessons and figured out ways to break in my cleats, and, I’m sharing those here.
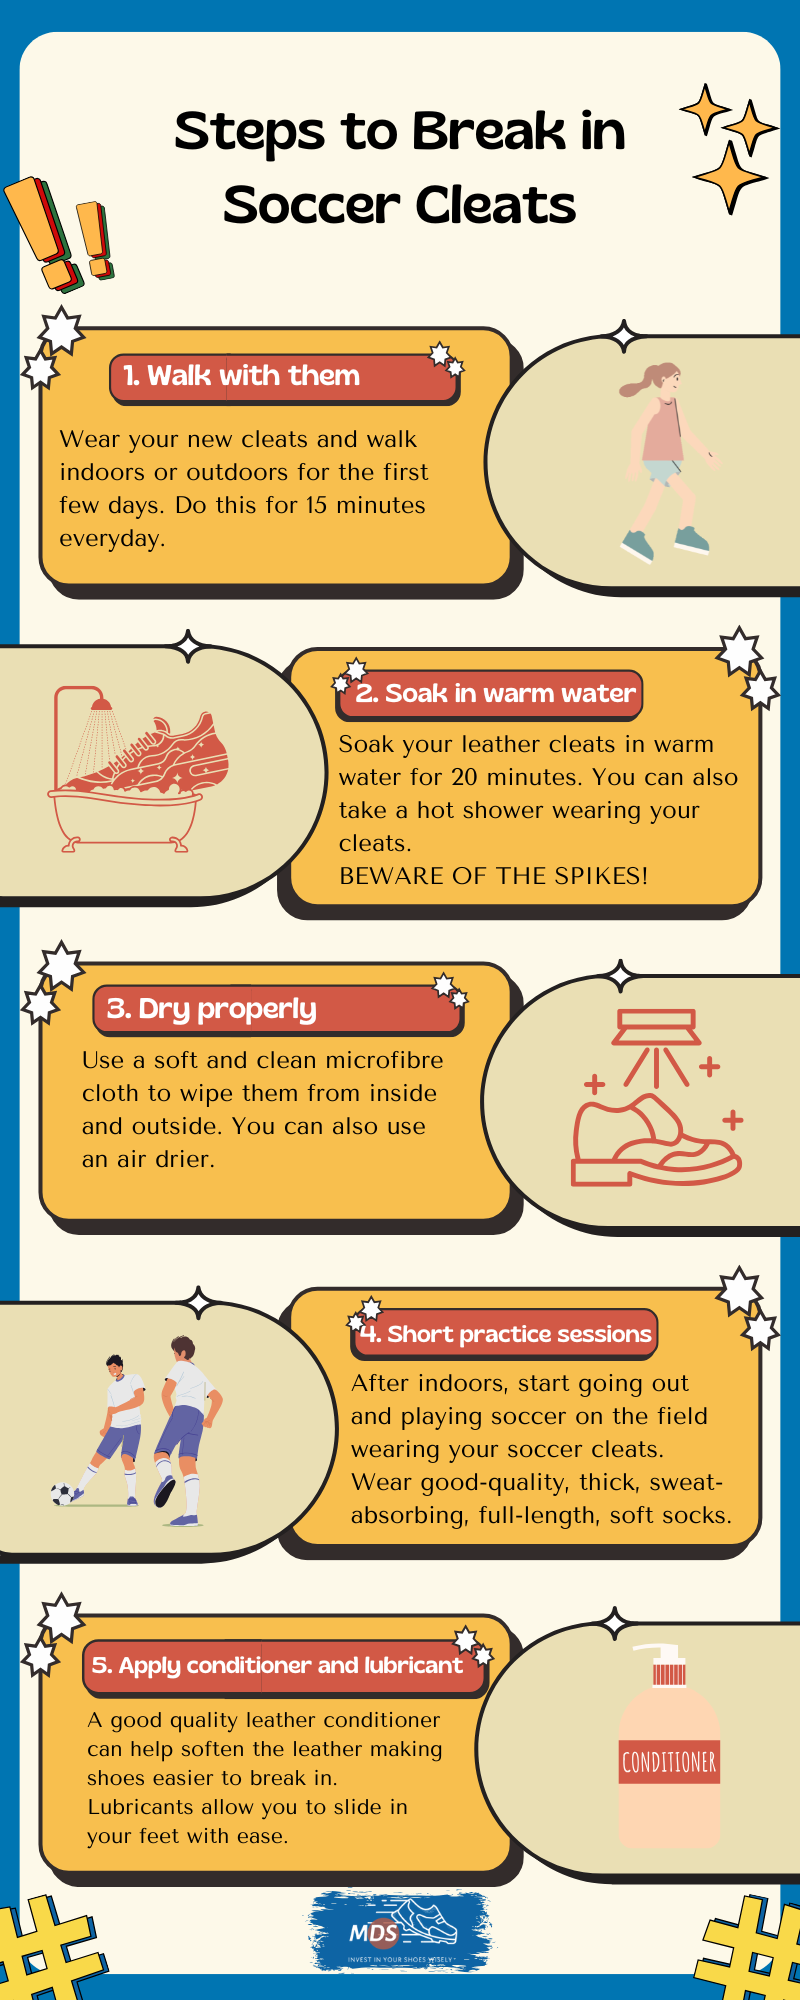
1. Walk with them
Wear your new cleats and walk indoors or outdoors for the first few days. Avoid running while wearing them- since the side and back support may be too hard on your new shoes, running in them can bite your Achilles tendon and give you blisters.
To easily break into your cleats, take slow and short walks everyday (10-15 minutes on carpeted floors, backyards, grass, etc).
Once the shoe starts feeling more comfortable, you can increase the walk time to 40 to 60 minutes, at a higher pace. This will help your cleats loosen up naturally, with minimal discomfort.
Pro Tip- It’s also advisable to wear your ground socks while walking during the break-in phase. This will help you get used to wearing your favorite ground socks with your new cleats
2. Soak in warm water
I call it the ‘Grandma’s method.’ Mostly, I soak my new soccer cleats in warm water (hot enough so you can place your hand in the bucket, but not so hot that your hand burns) for 20-30 minutes. I prefer to do this because warm water makes the shoe material stretchy. It allows my feet to mold into the shoes comfortably.
This trick is super useful for leather cleats. My soccer friend Harry found the right leather cleats for himself, but they were not absolutely perfect for his feet, because, one shoe can not fit everybody. To make them fit perfectly, he started taking warm showers while wearing these shoes. He just needed the shoes to fit slightly better around his toes, as he has wider toes. These warm showers solved this problem for him.
However, I prefer directly immersing my feet in a bowl of warm water while wearing my cleats, as I watch TV. This allows the warm water to quickly soften the leather, making the shoe fit better.
Pro tip- Make sure not to use too hot water or submerge them for a longer time. Always air dry them and wear them to walk on the ground.
Here’s a video demonstrating the soaking process to break in your cleats.
3. Dry them properly
Once you are done soaking your new cleats in warm water, it’d be time to dry them out. I use a soft and clean microfibre cloth to wipe them thoroughly from inside and outside. Wearing wet or semi-dried cleats can cause blisters on your feet, which is why, it’s crucial to dry them properly before you sport them at a game. Plus, wearing wet leather cleats can also make them crack or harden their uppers and soles.
To quickly dry your shoes, you can stuff old newspaper or thick tissue paper inside your cleats and leave them in the open and airy space. I advise not keeping them in direct sunlight as it may lead to cracking.
Many people make the mistake of using a hair dryer or blower to dry the cleats. Doing this can damage shoe materials and reduce their durability.
A trick that works wonders for me: I remove laces to allow easy airflow through the eyelets. This avoids material damage due to wet laces and increases the longevity of laces and lace holes.
4. Practice for a short time
Once you get comfortable walking indoors with your new cleats, you can start going outside for quick practice sessions. I like to start with basic soccer drills like dribbling, passing, kicking, etc. when I wear such new kicks.
Also, as I suggested earlier, it’s best to wear the same socks you selected while trying these shoes indoors. These socks will give your soles proper cushioning and comfort while running on the ground, while reducing friction on the sole, arch, and insteps.
5. Newspapers and/or shoe stretchers
You can roll up and stuff the newspaper into the upper area while avoiding any bumps. Doing this everyday for a couple of weeks will certainly widen your shoes, allowing you to comfortably put them on and play in them.
Apart from that, shoe stretchers can also come in handy while breaking in soccer cleats. I tried using HOUNDSBAY shoe stretchers to break into my Nike Phantom GX 2. It was easy- I put the stretcher inside the shoe cavity, twisted the knob just enough, and left it overnight. Good part- it worked like a charm, and in fact, this was the easiest and the quickest process.
Tip: If you find your shoes still not fitting after a night’s stretch, try leaving the shoe stretcher inside again, with a wider stretch. This will definitely make the shoe fit you better.
6. Apply lubricants
Lubricants such as petroleum jelly can make it easier to put on and off your new soccer cleats. I remember, when I was a little boy, after a tournament match, I got a pricking bruise on my ankle while removing my cleats. My mother applied a small portion of Petroleum jelly (Vaseline) inside the ankle and tendon support and that saved me. The petroleum jelly softened the hard areas on my cleats and made the shoes comfortable to put on and off. Ironically, I used a little petroleum jelly on my bruise too to let go of the pain and roughness on the skin.
7. Use leather conditioner to soften them
You can use leather conditioner to soften your leather cleats. These conditioners get quickly absorbed in the leather and restore its flexibility, also giving it a soft and supple feel without adding any oiliness or greasiness to the shoe. I often use Renapur Leather Balsam and Lexol All Leather Conditioner for my current pairs of cleats.
Tips to remember:
Apart from the above points, here are some more pro tips to save you from unnecessary foot pain and bruises while breaking into soccer cleats.
- Apply good quality, lightweight, non-sticky, hydrating moisturizer on foot and soles, especially if you have dry skin. It avoids blisters and cracks in the skin.
- Use athlete’s foot powder to absorb moisture and reduce friction. I use Dr. Scholl’s ultra sweat-absorbing powder when I play soccer at clubs. It also serves as a perspirant that keeps my feet smelling and feeling fresh.
- Always consult an experienced podiatrist if you suffer from too much foot pain or excessive blisters while wearing a pair of cleats for the first time.
- Use new and old cleats alternatively so that your foot adjusts to all of them properly.
- Always trim your toenails to avoid injuries and pain while wearing cleats.
Marty’s two cents
From my 16 years of soccer experience, I have learned that the amount of time required to break into cleats can vary from person to person. To some, it may take a week, and to others, even two to three months may not suffice. However, the right techniques can do the trick for you- and shoe stretchers can do it quicker than others. On that note, which of the above methods would you like to try first? Do you need any further help with that? I’d love to hear from you in the comments below.
FAQs
Now, let’s move on to some of the common questions and answers that can help you better understand your cleats.
1. How long does it take to break in new soccer cleats?
It usually takes a few days to a week, depending on how often you wear them, the method you use, and the material of the cleats.
2. Can I use my new cleats for a match immediately after breaking them in?
It’s best to use them for training sessions first. Once they’re fully broken in and comfortable, you can use them in matches.
3. What should I do if my cleats are still uncomfortable after breaking them in?
Consider using additional padding or visiting a foot specialist for advice.
4. Are there any quick fixes for blisters caused by new cleats?
Apply blister bandages or moleskin to affected areas and keep your feet dry and well-moisturized.
5. Do soccer cleats need to be broken in?
If you do not break in these shoes, you may experience discomfort and foot pain, or even get blisters, cramps, and face imbalance of blood circulation in the feet area.
6. What ruins soccer cleats?
Extreme heat can dissolve the glue on the soles of the cleats. That’s why experts suggest to avoid soaking soccer cleats in water for too long.
7. Can I play soccer without cleats?
No, it’s highly recommendable to only play soccer with proper footwear on. Not wearing cleats in a soccer game can cause serious, long-term injuries, putting you off the field for a long time. Wearing cleats helps soccer players maintain a firm grip and stability while running on the ground, also keeping them from slipping and sliding on the grass or mud during rainy days.